![]()
MediaMaster Pro 2.2 makes it possible to warp the output per screen and adapt the soft edge on each side of an output, the video below will demonstrate this with a simple setup made with two beamers projecting visuals from an A10 Media Server on a curved screen. But of course it can handle much more complex setups depending on your graphics card.
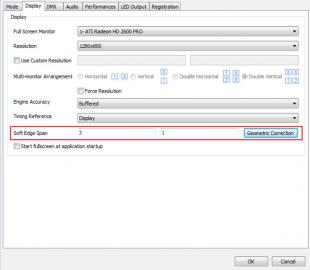
The settings can be modified in the “Geometric Correction” dialog which can be accessed via the “Geometric Correction” button near the soft edge span dimensions on the video tab of the preferences dialog.

The number and arrangement of the outputs is determined by the soft edge span dimensions.
Geometric Correction
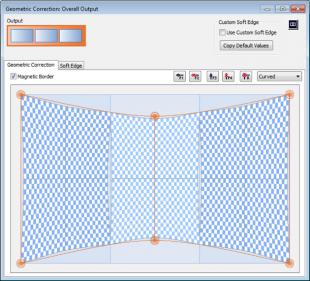
With geometric correction it is possible to correct output deformations via a correction grid.


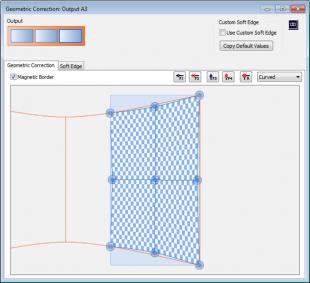
Three main areas can be distinguished: the screen arrangement, the toolbar and the correction grid. Via the clickable screen output arrangement, at the top left of the dialog, it is possible to switch between the corrections grids of the different screen outputs.
A normal output is represented by a blue rectangle and the overall correction grid is represented by an orange rectangle. With this overall correction grid it is possible to apply a correction over all displays at once. This especially meaningful when displaying using multiple outputs to project on one curved screen.
With the drop-down list on the toolbar the geometric correction type can be chosen. 4 different correction types are available, namely:
- No Correction: If you don’t want to apply geometric correction to this screen. In this way MediaMaster knows that it can bypass the geometric correction process for this screen.
- Linear: A linearly interpolated grid for straight corrections.
- Curved: For smooth geometric corrections such as a curved screen.
- Nurb: Another method for smooth geometric corrections.
The correction grid is modified by moving one of its control points. The control points can be moved by the mouse cursor or by arrow keys for per pixel precision. Control points can be added with the appropriate buttons on the toolbar and via the keyboard shortcuts (F1-F4). Via the reset button the grid can be set to its original state.
The magnetic border makes the screen border ‘sticky’, thus making it easier to correctly position a control point to the border of the screen.
The following shortcuts are defined for the geometric grid window:
| Shortcut | Action |
|---|---|
| F1/F2 | Add/Remove Horizontal Control Point |
| F3/F4 | Add/Remove Vertical Control Point |
| R | Reset Control Points |
| M | Cycle Through Correction Modes |
| Arrow Keys | Move Control Points Per Pixel |
| CTRL + A | Select All Control Points |
| CTRL + MOUSE CLICK | Select Multiple Control Points |
| TAB/TAB + SHIFT or +/- | Cycle Through Control Points |
| Double Click (Outside an Output) | Go To Overall Output |
| Double Click (Inside an Output) | Go To Selected Output |
| Scroll Wheel | Zoom View In/Out |
| Middle Mouse Button | Pan view |
Soft Edge per Output
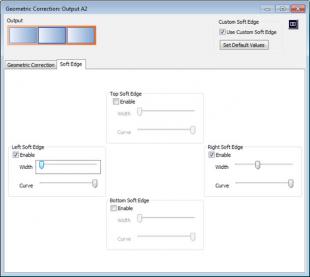
With the custom soft edge it is possible to adapt the soft edge parameters per edge of an output.
Two controls can be found in the “Custom Soft Edge” panel, namely the check-box “Use Custom Soft Edge” and the button “Set Default Values”.
The check-box will determine if MediaMaster will use the standard overall soft edge or the custom soft edge per side.
The “Set Default Values” button will copy the curve and fade curve parameters of the overall soft edge settings, plus the soft edge setup, to the custom soft edge settings.
Note that using the custom soft-edge will disable the master fixture’s soft-edge.

In the soft edge tab it possible to adapt and enable the curve and width parameters per side of an output.
Now with new geometric correction and custom soft edge in MediaMaster Pro, it has never been so easy to project video on non-planar surfaces.


